Monday, June 4, 2018

Netscaler Gateway 12.0 Force failover (Command line - Force Failover)


The Force failover did not work due to permission issues.

Problem with password.

We worked on the test environment.

Working in his laptop. Password issue/UPN is working/Tried with AMCS LDAP. We try with EMEA authentication.

After change in permissions at the AD LDAP level, we were able to force fail over and the Services were running fine on the Primary Netscaler Gateway 12.0


Tuesday, May 1, 2018

Lessons Learnt - Xenapp and Xendesktop 7.15 Long Term Service Release - September 2017


1. Why upgrade from Xenapp 6.5

End od Maintenance - Dec 2017
End of Life - June 2018
EOLExtended Support - Jan 2020

Common Upgrade Challenges

1. Picking a Version - Long Term Service Release vs Current Release.

2. Translating feature between IMA and FMA
Zones
LHC
Advanced Application Mgmt

Agenda -
Versioning - LTSR vs Current Release.

1. Citrix Cloud Releases. - Always the latest.

2. Current Releases - New Feature Releases

3. Long Term Service Releases - Predictable release Cycles...

Comparing Release Offerings.

1. Customer success services required.
2. Product Lifecycle timelines.

Lifecycle -Policy Updates - Current Release.
Long Term Service Release -

Product -
Xenapp Xendesktop - 7.15 LTSR -- 15 Aug 2022 --- 15- Aug - 2027
Xenapp Xendesktop - 7.6 LTSR  -- 11 Jan 2021 --- 11- Jan - 2026

Key Lifecycle 7.15 LTSR Considerations.

1. Xenapp & Xendesktop 7.15LTSR supports Windows 2008 R2, 2012 R2, and Win 2016

2. LTSR VDAs can be mixed with a CR Site .


Feature Translation --

IMA:FMA:: LHC ??
Zones: What are they ?
A Zone in Xenapp 6.5 is a subset of a farm. that containts session hosts
and controllers.

A Zone in Xenapp 7.x is a subset of a Site, that contains VDAs and
optionally Delivery controllers, which communicate to a centralized
SQL database via a Low latency connection.

Two types of zones are available: Primary and Satellite.

Pre 7.7 VDAs do not honor Zone designations and will accept all requests.

POD Architecture is Not Dead.

Failure and update domains are still a factor.

Just because we have zones, does not mean we should deply single.
global sites.

Zones are another tool in the toolbox.

Local Host Cache: What is it?
In Xenapp 6.5 this was a cached copy of the farm datastore.

In Xenapp 7.x, this is a SQL LocalDB Database that exists.
LHC allows continues for continued user connections

Transition Planning -
Must Everything Go.. GO..
New environment builds

Monday, November 2, 2015

Citrix XenApp Server Monitoring Script / Citrix Server HealthCheck Script

I would like to share the Citrix XenApp Server Monitoring Script  / Citrix Server Health Check Script which is created by me with the bits and pieces of scripts which i found in Google and some useful blogs.
Being an administrator, you need to check the status of Citrix server. Logging into the server and checking the details is a hectic process. What if you could sit and relax and if any issues, you receive an email in your inbox. Wonderful!… Right?
The main advantage of this script is that you will get a beautiful report in your inbox which helps you to identify the issues in your Citrix Environment in short. It is easy to implement the script by non-scripting people too.

Why my script? For Better presentation and logging. Simple and understandable Email reporting.

What is the requirement?
1. Need to have the Power Shell V2 installed on one server [Prefer ZDC]. [Note: You may need to install the Power Shell on all your legacy servers if the script does not function as expected]
2. Need to have the XenApp Commands Tools / SDK Installed on this server.
3. Power Shell Remote Execution Policy to be enabled.
4. Make sure that you have any Power Shell Editors installed on this machine [PowerShell ISE, PowerGUI Script Editor, etc]

What you have to do?
1. Download the script from the site [If no download link available, email to ginsmon@live.com]
2. Copy the script into a directory on your ZDC / The server which you prefer.
3. Open the script with the Editors and fill the missing parameters based on your Customer Environment.
XenAppHealthCheckScript1
4. Once you complete with the required details, please save the script and execute the script using PowerShell.
5. Wait and watch what is going on… Hurray!… It is an awesome simple report in your mailbox or in the PowerShell console.

What are the advantages or what does this script checks?
1. You have not required to provide any server list or names. The script will automatically pulls the servers names from the Citrix Farm using ZDC.
2. It can easily adapt or implement on any Citrix XenApp 4.5 / 5 / 6 / 6.5 Environments with Windows 2003 / 2008.
3. The script checks the below parameters on the Citrix servers and report to you the status.
##   – Ping response of the Server.
##   – Citrix Logon setting status.
##   – ICA Active Sessions on the server.
##   – ICA Disconnected Sessions on the server.
##   – Citrix License Usage on the License Server.
##   – Assigned Load Evaluator to the Citrix server.
##   – Citrix Server Load.
##   – RDP port response.
##   – ICA port response which identifies the Listener down status also.
##   – CGP port response (session reliability).
##   – CPU Usage of the server.
##   – Memory Usage of the server.
##   – Citrix Related Services (IMA, Print Spooler, Citrix Print, WMI, XML).
##   – Server uptime (to ensure scheduled reboots are occurring).
##   – Server folder path and worker group memberships.
##   – Applications published on the server.

Here is the awaited Results… The wait time is over… Grab it at the earliest…

1. You can schedule to run this PowerShell script using the Scheduled Task if you want to run it periodically. If you are running the script manually, you will find the below screen in PowerShell console.
2. At the end of execution of the script, you will get the result as shown below in your PowerShell console.
XenAppHealthCheckScript2
3. You do not have time to login to the Server and check the Console result everytime and you need an email report. Below are the screenshot, how your email report looks like…
XenAppHealthCheckScript3
XenAppHealthCheckScript4

4. Also the email which you will receive has an attachment which contains the detailed log file for your detailed reference.
XenAppHealthCheckScript5

Hope i was able to contribute to reduce your human effort in checking the Health of the Citrix XenApp Servers.
If you find this script useful for you, please donate to assist you more :-)


Credits: Jason Poyner [He is the real hero behind the HTML reporting codes]. Ref: http://deptive.co.nz/

Tuesday, September 8, 2015

Citrix mounts Acropolis, offers support for Nutanix citizenry

No need to beware of geeks bearing gifts, this time

Parthenon
The Parthenon, part of the Acropolis citadel
Citrix, whose CEO Mark Templeton is on the way out, is under pressure from activist investor Elliott Management as it supports the whole Acropolis product set – which has now become "Citrix Ready", in Citrix-speak.
Acropolis can be used as the base for Citrix XenDesktop (VDI) and XenApp (app virtualisation) products.
Nutanix's Xtreme Computing Platform running the Acropolis Hypervisor has been verified as Citrix Ready for XenApp and XenDesktop 7.6, as well as NetScaler and ShareFile.
It's good news for Nutanix, and Citrix will be hoping that Acropolis adoption will help it survive competition from VMware and Microsoft.
Nutanix blogger Kees Baggerman said: "With Citrix Ready certification from Citrix for XenDesktop on Acropolis Hypervisor, we can deploy VMs hosted on Acropolis Hypervisor with the Citrix VDA installed. Combining that with an intelligent script framework based on PowerShell, we’re able to deploy VDI or RDSH-based VMs that are ready to provide desktops and/or applications to your users."
He said that the "next phase will be to provide an integrated deployment method that will support automated machine catalog management on MCS (Citrix Machine Creation Service)."
Anything such as this, that makes life simpler for users and admins, will be good, and if Nutanix Acropolis/Citrix performs better than Nutanix/VMware then so much the better.
Citrix and Nutanix are planning to formally support XenApp and XenDesktop software on Acropolis Hypervisor in September. ®

Microsoft, Symantec, VMware, Citrix, Red Hat to dominate $2.6 bn application virtualization industry

According to a report by Research and Markets, the global application virtualization market is expected to grow from USD 1.3 Billion in 2015 to USD 2.6 Billion by 2020, at an estimated Compound Annual Growth Rate (CAGR) of 14.9% from 2015 to 2020.
The key players of this market are Microsoft Corporation, Symantec Corporation, VMware, Inc., Citrix Systems, Inc., and Red Hat, Inc.
Image used for representation purpose only. Agencies

The most serious concern of today's IT industries is to minimize the maintenance cost and maximize productivity. To achieve this, it is important for an industry to optimally use its resources. There are diverse operating systems available in the market with their own set of operating environment, features, file system, registry, support to the applications, etc. This prevents the use of an application developed considering a specific operating system to be executed on another. To use such applications one need to switch among the operating systems that support the application. This is a very tedious task for the user. Application virtualization is the solution to this problem. It allows the execution of an application under a non-native operating system. It acts as an interface between the two.
Application virtualization basically translates the machine code of the application written according to its native operating system into the machine code of the non-native operating system where it is intended to be executed by the user. At the core of application virtualization, there are four important modules: input/output interface, graphics interface, hardware interface, and library functions interface. The main drivers of the market include the adoption of third platform among SMBs, decrease in administering cost of IT systems, licensing & support policies, and increase in speed & efficiency.
The global application virtualization market has been segmented on the basis of applications, platforms, technologies, services, end users, verticals, and regions. The types of applications are application security virtualization, business function as a service, and virtual application management; the platform types include native platform virtualization and full platform virtualization, and the technology types include file I/O redirection, registry redirection, com isolation, dot net isolation, service isolation, application isolation, and driver isolation.
According to another report by RnR Market Research firm, enterprises are adapting application virtualization market products and services to implement better speed, efficiency, and improvement in the operational process. Application virtualization includes the dynamic delivery of applications so that they can be accessed online, offline, or anywhere. With the deployment of application virtualization the enterprises achieve flexibility in their overall workflow management.
Application virtualization is beneficial as compared to software virtualization and can easily be integrated with server virtualization which increases the speed and efficiency of overall IT system of the organization. It allows the execution of the incompatible application side by side at the same time. Application virtualization can also be integrated with application streaming, which streams a portions of the virtualized application to user's computers as required. These factors help for the increasing adoption of the application virtualization market solutions.

Sunday, September 6, 2015

Citrix's new CEO will need to embrace the competition in areas where they don't lead

On yesterday’s podcast, Gabe, Jack, and I talked about Citrix’s challenges for the year ahead. At one point we were talking about their new CEO, and Jack asked me, “What do you do if you’re the new CEO of Citrix?"
The most important thing is that Citrix has to let their customers build custom solutions around best-of-breed products, even if those products are not from Citrix!

Let me explain...

Citrix is really good at XenApp and XenDesktop. It’s a huge business and the reason that most Citrix customers are Citrix customers.

About ten years ago, Citrix started down the “suite” path (as many vendors did). So now if you look at the Citrix suite, it’s not just XenApp and XenDesktop, but it’s other products like ShareFile, XenMobile, NetScaler, etc.
Here’s the problem. While most customers buy Citrix for XenApp and XenDesktop, Citrix as a company has been trying to force/grow their footprint/stranglehold by creating “first class” integration between XenApp/XenDesktop and ShareFile, XenMobile, and NetScaler.

In other words, ShareFile integrates with XenApp/XenDesktop and all the Receiver clients in a great way—better than any other enterprise file sync & share product such as Dropbox, Box, or OneDrive. XenApp/Desktop integrates with XenMobile better than any other EMM product like MobileIron, AirWatch, or Good. And XenApp/XenDesktop integrates with NetScaler better than any other application delivery controller such as F5.
This is a problem for Citrix, because while most customers choose Citrix because of XenApp/XenDesktop, theydon’t choose Citrix because of ShareFile, they don’t choose Citrix because of XenMobile, and they don’tchoose Citrix because of NetScaler.

So if a customer wants to use XenApp/XenDesktop with Box, they get a second-rate, less-integrated experience. If they want to use XenApp/XenDesktop with MobileIron, they get a second-rate, less-integrated experience. If they want to use F5, they get a second-rate, less-integrated experience.

Back in the day, Citrix MetaFrame was the best-of-breed product that could be easily integrated with other best-of-breed products. But today, if a customer wants to use XenApp, XenDesktop, Box, MobileIron, and F5, they do not get a fully integrated, delightful experience. The only way a customer can get that fully-integrated, full-potential, first class experience, they have to use second-, third-, or fourth-rate products with their best-of-breed XenApp/XenDesktop.

Being a Citrix customer in 2015 means that you’re forced to compromise. It is literally impossible for Citrix customers today to have best-of-breed across the board. This is Citrix’s death warrant.

Now imagine the alternative. What if Citrix actually made a real effort to make Box, Dropbox, OneDrive, and every other EFSS product integrate with XenApp/XenDesktop as smoothly and nicely as ShareFile? Certainly the other EFSS vendors would jump on board because they’d like access to Citrix’s huge install base, and they’d love to provide their customers with a nice, integrated, first-class experience. The same is true for the other product sectors too.

To be clear, I’m not saying it’s bad that Citrix has their own EFSS, EMM, and ADC products. I’m just saying that Citrix needs to make sure that all of these types of products are are first class citizens within their ecosystem. For every dollar they spend developing ShareFile, they need to spend a dollar making sure XenApp/XenDesktop integrates with all the competitive products too.

The days of 90s and 2000s monolithic suites are over. Today’s CIOs want to buy the best-of-breed products in every category, and for $500 per user for XenApp/XenDesktop, you can expect they want their other best-of-breed products to integrate in a first class way. Citrix’s new CEO needs to embrace the reality that Citrix is never going to lead in all these categories, and even if they could, they’re never going to convince all their customers to go with the entire Citrix stack. It’s time to hug the competition instead of trying to force products where they don’t lead onto their customers. Citrix needs to create a world where buying Citrix doesn’t mean their customers have to compromise in other areas.
 - Brian Madden Citrix Blog

Citrix aims to woo VMware customers with free migration perks

Citrix is now offering customers of rival virtualization vendor VMware a steep discount if they migrate platforms.
The short-term offer will give VMware Horizon customers 50 percent off licenses when they switch to Citrix Workspace Suite, which includes the XenApp and XenDesktop virtualization products. Citrix is promising that VMware defectors will experience zero downtime, zero disruption and no productivity loss.
Citrix offered up a few examples of XenDesktop's supposed superiority, such as faster image updates, reduced bandwidth requirement for HTML5 access, and better performance on printing, saving files and launching apps."If you thought migration would be hard and time-consuming, then we have some good news for you," Citrix's director of technical marketing Vishal Ganeriwala wrote in a blog post. "The migration service can help you migrate in less than 15 minutes with almost no downtime if you have a XenDesktop environment deployed. Now, do I have your attention?"
While these types of discounts and incentives are common among competing telcos and tech vendors, the Citrix offer is notable because of its timing: VMware's VMworld conference is currently underway in San Francisco.
Citrix has also taken aim against VMware's "one cloud, any application, any device" strategy. The slogan is a central theme at this year's VMworld and encompasses the company's vision for any app, running at all times on any device through a software-defined infrastructure model.
Citrix counters the notion as cloud restrictive and has been tweeting the hashtag WhyOnlyOne.

Tuesday, November 20, 2012

Implementing VDI or Getting started with VDI


Go to Citrix.com, Products & solutions and search for vdi in a box, Select try It, fill out a form and get the download.


There are 3 versions, one for each of the hypervisors they support, Microsoft Hyper-V, Vmware Vsphere, or Citrix  Xenserver, So, after we download the appropriate zip file for vmware vsphere,  which is where we are going to test. 
After download, we extract the file, you will get a OVF file, Open Virtualization Format, open virtual appliance, which you can import into Vmware Vsphere, So we go to the vsphere client, and then from here we go to File, deploy OVF template, browse for the template, There is the OVF file. Click Open


Next It finds the VDI manager for  ESX, click next, it finds the VDI manager for ESX, 


We will name  it – VDI in a box, we will put it in one particular data centre, I will put it on host no. 1, We won’t put it in a resource pool at this time, we are going to put it on the local storage, because we are testing this in our lab, there is plenty of space free,  Lets go ahead and do a thinly provisioned virtual disk, because this is a test, and you wouldn’t want to do this in production, lets click next here, connect it to the default network, and at this point we are ready to complete, we will go ahead and power it on after deployment. Click finish,


Now its creating the new virtual machine , and deploying the OVF template VDI-in-box. Because this is about a Gig, it will take some time. With our deployment successfully complete, we will just click close.


Notice that we have a new virtual appliance here, called VDI-in a box, so we are going to click on that, we can see here that it has an IP address


Lets go ahead and open the console, though it is not technically required. This is it, we get a basic login prompt here. To access the console go to  , https://10.0.1.111/admin/


Lets go to the web browser, so here in my web browser, we go to https://10.0.1.111/admin/
It tells me, its untrusted, we understand the risk. Click technical details, confirm security exception, 


Here we go, we get the Citrix VDI-in-a-box login, we enter the login credentials, username – vdiadmin, password, kavazi


Once you login, you get the below screen.


Here we go, it tells us, thank you for choosing VDI in a Box, We want this to be fast and pleasant experience, the basic setup process here is to setup your hypervisor, VDI-in-a-box grid, generate a base desktop image, generate a template from the base image, and then assign users to the desktop.  Lets go ahead and get started here

To setup our hypervisor, first we need hypervisor credentials, credentials for using active directory if we are using active directory, and then a reserve IP address, for VDI- in a box, click continue


 Next up, we are being asked for the IP address of Vmware Vsphere server. VDI-in- a-box has deducted that we are using Vsphere, this will be the actual IP address and root username credentials for the ESXi host, the VDI in a box virtual machine is running on. In our case, enter the IP address as 10.0.1.11, Root is username, and enter the password, Click next.


We have successfully connected to the ESXi host, lets go ahead and select the datastore, We are going to choose the local datastore now. Lets pretend, that we don’t have a SAN now. The network label is going to be the default, VM network. Click Next here


 At this point it says that, we have successfully configured VDI in a box server, just 2 screens and we are done, Now it says, if you want to create a new VDI-in –a-Box grid , you can just click next here, since this is a brand new server, brand new install, which is what we are going to do. Lets say if we want to provide a scale, and provide additional virtual desktop capacity, with VDI in a box, you would  go ahead and join an existing VDI in a box server, or if you were looking to provide high availability by adding another host, you would join an existing vdi-in-a-box grid.  In our case this is a brand new install, So we select to create a new VDI in a box grid, and click next


Lets give this grid a name, we will call it WireBrainCoffee-VDI-Grid1, here we need to select a user database, its either going to be VDI-in-a-Box workgroup or if you have a Microsoft AD infrastructure, you can use that. In our case, we do, we enter 10.0.1.20 here, enter domain name, wiredbraincoffee.com, username, administrator and password credentials, we can also choose to enter the vcenter credentials, In our case we do have that, hence we can go ahead and add that. Lets give it a try and click Next,


At this point, We are almost done, it will ask you, if you have reserved, dedicated IP address for the VDI-in- a Box manager, basically it wants to know if you are using dynamic or static IP, we are going to say yes here, this is our lab infrastructure we are using HTTP, but its not going to change, I will just say done here,


Its popping up to say that, we have to generate a base desktop image, the base desktop image is going to be the virtual machine that we create, brand new from scratch, we install operating system, applications and so forth, and all the other virtual machines, all the other virtual desktops that connect, their virtual machines will be cloned from that base desktop image, basically a template will be created,  from that, and every time a new user connects, they will get their own virtual machine, based on that template, so to do this, make sure DHCP is setup, that you should have a running Windows XP, or Windows 7 already on the hypervisor to copy, as the base desktop image, and the credentials for the domain controller, if you are using active directory, so we click continue here,


We have a Windows 7 32-bit virtual machine already installed on my ESXi host. We aregoing to select it here, the name is Windows 7 32-bit. Enter a new image name, we will call it once we create a template from this, it will be VDIBOX-WIN7-1 , enter description as Golden Win 7 32-bit image for VDI in Box. I will click import here, 


We are creating our new VDI-in a box virtual machine, it will take a few minutes here,


Our virtual machine is successfully been cloned. Now we are at the point where we need to install the desktop agent on the virtual machine, this is just  a little application that runs, on every virtual machine, in the desktop virtual infrastructure, which allows the virtual machines to communicate the status back to the connection broker, so it wants us to connect via the RDP, and then copy this link into the  browser URL, so we could install the desktop agent, lets go ahead and click connect here,


Here on the virtual machine desktop, we will go ahead and open my web browser, and from here we can paste that URL, we will accept the security certificate here, and then we need to install the desktop agent. Make sure the VM is member of the correct domain, or workgroup. Also make sure that the  windows firewall, is either not running, or if these ports have been specifically open, and then finally make sure the remote desktop access is enabled for the users who will be accessing this virtual machine, We will go ahead and click the install button, to install the desktop agent 32-bit, version, We will click to run the application,


Here we go, here it says, Welcome to Citrix vdi-in-a-Box Desktop agent, setup wizard. We will click next here. 


Click Install.


It says, VDI-in-a-box desktop agent installed successfully. Click ok and Click Finish. It will automatically launch the agent. 


 When we did that, it kicked us off, and it logged us out of the remote desktop connection and now we are back here at our administrative console, you can now see that its waiting for the protocol, connecting to the new virtual desktop, now lets give it just a second,


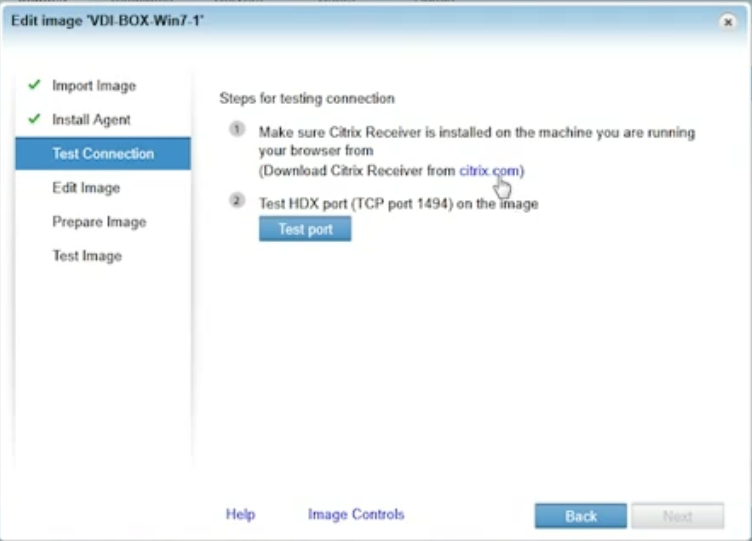
With our agent successfully installed, we need to download the citrix receiver here, to be able to test the desktop that we created, click here to download the citrix receiver from citrix.com,


My platform is Microsoft Windows 7, We will click here to download, web access, with the citrix receiver installation completed, Now lets go back, 


We have completed the 1st step, the receiver is installed.


 Now lets test the HDX port, which is TCP 1494, on this image, we will click test port, you can see below that test succeeded, you may move to the next step.


 The next step is to edit the image, we have a working virtual machine, which is the golden image for all the end users, to connect to, in other words, their desktop will be cloned, off to the image, not only do we want the Operating system ready to go, we also want applications to be installed, on the image, of course it is optional, to test desktop virtualization, but in production, you would install MS office, you would install maybe Quick-books, and other applications your end users use to do their job, would be installed at this point. So connecting to the virtual machine and installing applications, is optional, but we do have to view and verify the following information is accurate. So, we are going to click View here,


Do you have a valid MS volume license key, Yes we do.

Are remote connections enabled for remote users? Yes.

Are group policies, configured to allow remote desktop connections, and HDX, Yes.  Are all services, that might interfere with the desktop generation process disabled, such automatic windows update, screensavers, end point services, and other anti-virus services.  Click Yes to all and choose done.


Click “Next”


 At this point we need to prepare our image, we need to enter the domain name, in this case, it’s the wiredbrain coffee company, we need to enter the administrator username & password here, as well as the domain password, the organizational unit is optional, we will select the EST time zone, let me scroll down here, we will keep the default computer name prefix, we will use the local administrators profile as the default profile, we will use a MAC key instead of KMS key for windows, license activation, and then we can just click prepare here,


 We will click confirm,


 And this will just take a few minutes to prepare the desktop image.
 Now that we have prepared the desktop image, now its time to test it out, and verify our end user experience, we want make sure, that the end users will get the desktop, that we want them to have, that their applications will be installed, and working, their profile personalization will work, and they can access their desktop, via their desired remote protocols, such as Citrix HDX, or Microsoft RDP, so now we are going to click connect,


We will take the default here to connect, via citrix HDX, using the citrix receiver that we installed,

We are going to login as a AD test user, that I created, named Bob@wiredbraincoffee.com, and type in as password, click login, 


And there we go, we have successfully logged in, as Bob


If we go to the computers properties, here, we can tell that it’s a Intel Xeon, 520 CPU, actually that’s the CPU type where the physical server is running the vmware, we have 4 Gigs of RAM installed, that’s 4 Gigs of virtual RAM, as you can see down here by the computer name, the virtual desktop was automatically created, we prepared our image, automatically created computer prefix VDI 900 C, now if we were testing this out for production, we want to go in here, to see all the end users program are installed, make sure they can customize, their desktop, personalize it, whatever it is, that they need to be able to do. We proved that we can successfully connect, a desktop, in the VDI in a box, running on top of Vmware vsphere, using Citrix HDX, with Citrix receiver, so with that, lets go back to the administrative console, for VDI in a box, and see what else we need to do.


No w that we have imported the image, installed the agent, tested the connection, added the image, prepared the image, and tested the image, lets click save on the image


Now it says, this will save the image, and distribute the saved image to the other servers in the grid
However, since we only one server in the grid so far, It shouldn’t be propagating that saved image at any other server at this point, of course if you want high availability, or need more scalability, you would be adding more than one server, in your grid, so click confirm here


 And it is going to go through the process of shutting down the virtual machine, and getting it ready for end users to connect


 Ok went from no. 1 to no. 2, and now we are at no. 3, which is just create desktop templates, base image, to do this, enter the names and descriptions, specify how many user desktops we want to create, as well as refresh policy for the desktop users, we will click continue here,


 And we are going to give this template a name, we are calling it VDI Box, Win 7 template1, we will be using the image we have been working with so far, we will need to give this a description, for this template, WIN 7 test lab, VDI in a box, we will take the default memory of 1 Gig, and click next


 The maximum no. of desktops, we are going to have is 4, and we would like to have  2 pre-started desktops, we will click save here


The template has been saved successfully, now we will close,


 And now we have to assign some users  to our desktops, so I will click continue here,


Now we need to find user group, users, IP addresses that can access our virtual desktop infrastructure, and specifically, certain templates, like the templates we just created, so we are going to find a user group, and for the purposes of the demo here, we will call it all AD users, and then for the template, we will select the VDI in a box, WIN 7 template one, say close there, and lets say save, we need to find user groups, users  or IP addresses, now I could find active directory user groups here, or specific active directory users, go ahead and give that a try, We are going to say that the user ID is Bob, that’s the test user we used, and we are going to define that, he can access the template we have been working with, so we will say save here, and now Bob should be able to access, the new virtual desktop that we created, maybe we want to setup a group of active directory users, all users who need access to virtual desktops,  as a group here, and authorize them for specific templates, with our user configured,


Lets go to the desktops tab here, and see if we are ready to test this out, with our real end user using our new cloned templates, that are up and running, in our Vmware Virtual infrastructure, so take a look at the desktops tab, first you got the capacity, to running the additional capacity of the desktop that haven’t been started, maximum no. of users, and then the total capacity, based on just the single server, that I have currently in my lab infrastructure. Here you see that template that we created, if you look here at the right, we see maximum no. of 4 desktops, that we want, our  end user is able to connect to, then we want 2 that we want to get automatically started, ready to be connected to any point and on the right here, moving on, we got one desktop, that is new, new means, that is ready to go, and then one that is still in the process of starting, so at this point, we should be able to test this out, lets say that I am an end user and I want to connect to my VDI in a box virtual desktop, there is actually multiple ways to do it


One way is to just point your, web browser, to the IP address here, of the VDI in a box, server, and then you login as the end user, so login as Bob


Since we have only 1 desktop, we are automatically connected to that desktop, since I am using firefox here, it popsup with a little message,


And then, there we go, that’s my desktop, it comes up super fast, and then it automatically logs on, using Bobs, active directory, username and password,


And there we go, there is my desktop, We can go to the start menu, and we should have all our applications for end user, and things look good to go, and if we go to the vsphere client, check out the virtual machines that were created. Thanks to VDI-in-a-box.


Here at the Vsphere client, of course we have the original Vdi-in- a-box, virtual machine, that we deployed, to make this host as part of the Vdi-in-a-box grid, and then we have 3 Vdi-in-a- box virtual machines, these are managed by the VDI-in- a- box, virtual machine


So that concludes the initial setup and installation of VDI in a box, we went through the process of creating images, templates, we assigned users, we installed the desktop agent, we installed the citrix receiver, and then we assigned a user and tested it, with an active directory user, that concludes the getting started with VDI document.